NavAO

Monday, August 27, 2012

Our {Home} School Room

Ever since we started homeschooling, I've given lots of thought to our school room. We actually didn't have a dedicated space to home school. And since our decision to  home school happened very quickly, we were totally unprepared. What we had was an office/playroom. We moved some toys out of the playroom to make room for a bookshelf and a seating area. I really just wanted space for our books and other materials. We spent our first year of homeschooling doing "school" wherever we found space, ie dining room table, kitchen table, out on the patio, the local library, even the park.

That worked well for us, but it did take some planning because unless we were in our "school room" we had to plan ahead to get the right materials and books. All in all, not that big of a hassle.

As the school year wound down and summer rolled in, I started to think that I wanted a more dedicated space for school. I wanted a clutter free, organized space (I'm an organization freak). I live by the motto "Everything has a place and everything in its place". But the truth is, we just don't have that much space. I've seen pictures of other homeschoolers' "school" rooms and I must admit I feel jealous of the spacious, organized spaces they have. These rooms are so beautiful, full of shelves and books neatly organized on them. Bins and boxes for everything you can think of.

What I've realized is I have the space I need and I'm making the space work for us. It may not always be very organized but it does the job. The other thing I've realized is that I don't want to recreate a school environment in my home. I love being able to "do school" wherever we please. So as the new school year approaches, I have embraced the space we have and the flexibility to school anywhere.

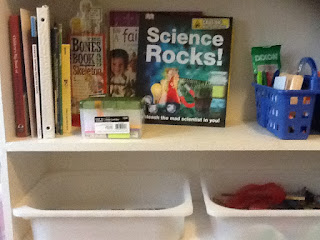
Here are some pictures of our home school room.
 
Close up of bins that I still have to label.

We have some of our books displayed and a caddy that holds pens, pencils, erasers, etc.

This is an index card box for our Book Club and Writer's Workshop. It has genres, writing prompts and techniques we will be studying and using.


Our Lego table is in our school room because Buttercup uses it a lot and we also do Lego challenges as part of school.

 
Where do you homeschool? Share here!!

Happy Homeschooling Adventures!!

Monday, August 20, 2012

Mac and Cheese recipe - Guest Post!


Today I want to introduce you to a fellow mom blogger! She's Bernadette from the Barefoot Hippie Girl blog. I invited her to share a story and a recipe with you guys, so here it is!


Hi! I am Bernadette, and I am the Barefoot Hippie Girl. I write about my life, cooking, fitness, parenting, homeschooling and whatever else is on my mind and heart.


Thanks, Alessandra, for sharing your space with me today. It is a great privilege.


I remember way back when-when my mom started teaching me how to cook. It was the year we began home schooling. The year I was in third grade.

Mom was determined to have some help feeding our family of (then) five kids. So, almost everyday she would get the 3 oldest of us in the kitchen learning to peel and chop onions, and can tomatoes, and make goulash and sloppy joe.

By the time I was 12, I was assigned Monday nights to showcase my skills. (Monday was my parent's date night.) That showcase generally included hot dogs. Or goulash. Or potato casserole. Or tuna casserole. (you get the picture-easy and quick)

Sometime within the next four or five years I got assigned more than one evening as chief cook. And I also grew to love cooking. I would try new recipes, and except for a few notable exceptions (like the pan of brownies without sugar or the other pan of brownies without the eggs) most things turned out very well.

The summer I was 19 I took off to a wilderness camp for a 10 week camp cook stint. This was paradise on earth. And maybe more than anything else, that summer shaped my three cooking philosophies.


1. Taste-make delicious food. This is all important.

2. Simplicity-don’t spend much more time cooking the food than it takes to consume it.

3. Aesthetics-get the most bang for your buck. Think colorful and variety.


Today I am going to share with you a favorite recipe that dates back to the very beginning of my cooking journey...Macaroni and Cheese.

I know, I know. We all love Kraft for convenience. But, if you want a fairly quick option, that blows Kraft out of the water, you should try homemade mac and cheese.

White sauce is easy to master. The secret is medium heat, and a wire whisk.

Baking mac and cheese brings all the buttery goodness to the top. So delicious. So NOT healthy. So worth it. Trust me on this.=)

For a pop of color, you can slice fresh tomatoes and arrange them on top. Mac and cheese is delicious served with a green salad, a green vegetable, or with fancy stewed tomatoes. (Check out that recipe here.)


Mac and Cheese

1 pound pasta (I prefer rotini or calatapi)

1 onion, chopped

3 T butter

3 T flour

1/4 t black pepper

1 t salt or to taste

3-3/4 cups milk

6 cups shredded cheese (cheddar or colby are best, can do a combination of different cheeses)

2 medium tomatoes sliced (optional)

-Cook pasta according to package directions.

-Meanwhile, melt butter in a saucepan, and add onion. Saute' until tender. Add flour and whisk until smooth. Add milk, salt and pepper. Cook over medium heat until thick and bubbly, stirring to prevent sticking. Remove from heat, and whisk in cheese. Combine sauce with pasta. Pour into a large greased casserole. Bake at 350 degrees uncovered for 30 minutes.

-This feeds 10. Half recipe for less. Or share with company.=)


Ummm, now I am looking forward to this for fall comfort food goodness!

Saturday, August 18, 2012

Slow Cooker recipe - Chicken and Lentil Stew


I have a rule about summer foods vs. winter foods. For me it's pretty clear cut. Crock pot recipes, like stews and soups are reserved for the winter when we are craving warm, comfort food. During the summer months I like to  make things that are light and fresh; lots of cold foods and plenty of grilling.


I recently broke my own rules by making this Chicken with Lentil Stew. The reason for the blatant anarchy was the need for having a healthy homemade meal without spending lots of time in the kitchen. I have been so busy this summer that by the time I get around to cooking it's either too late or I'm tired.

The crock pot takes care of that! So without further delay, here's my newest "go to" recipe!

Chicken with Lentil Stew

Ingredients:

6 boneless chicken breasts cubed
1 bag of lentils rinsed
3 plum tomatoes chopped
3 potatoes w/o skin and cut into chunks
3 cloves of garlic
1/2 onion
1 tbp tomato paste
2 chicken boullion
1 tsp rosemary
2 bay leaves
Salt and pepper to taste
1/2 cup red cooking wine
Water to cover everything

Directions:
  • Sautee chicken with garlic and onion until browned
  • Place chicken with garlic and onion in crock pot
  • Add all of the other ingredients to the crock pot (except potaotes)
  • Set the crock pot for 6 hours.
  • At about the 3rd hour add the potatoes
Optional ingredients:
  • Peas
  • Carrots
  • Celery
  • Bacon (pre-cooked)
These can all be added at the last hour.

Enjoy!

Thursday, August 16, 2012

Back to school Giveaway!

As a homeschooler and mom, I am always on the go. I live life on the fast lane between laundry, lunches, activities and blogging. One of the biggest challenges I face, is working on the go.  I don't always have access to all of my files and documents. One thing that helps is having a flash drive to store the things I will need for the day. That way I know I'll get my work done no matter where I am, whether I am sitting at a day long swim meet or  waiting at a doctors office. Wholesale custom flash drives is offering a Giveaway just for moms. If you visit their site you can get all of the details about how to get your own free flash drive.

In addition, The flash drive comes with a free ebook, 75 Creative Back to School Tips for Super Moms! The eBook includes 25 after school and play date activities, 25 snack and lunchbox inspirations, and 25 homework helper tips.

This eBook is great for moms and homeschoolers alike! Check it out here!


Wednesday, August 15, 2012

2nd Grade Art Project - Colored Sand Vases


A while back I had seen these really cute vases made with colored sand and I knew I wanted to try to make them. I started collecting glass jars and other glass containers that would have been thrown out (reuse and recycle!). When we finally had the containers I couldn't find the magazine or website that had the intructions to make the colored sand vases. So I pretty much had to figure it out on my own, but I have to say Buttercup and I are very happy with the results.


What you'll need:

Tacky glue
Colored sand
Glass jars
Plastic spoon
Paint brushes


Once we had our work area set up, Buttercup chose the colors she wanted to use. I poured glue in a disposable plastic container and Buttercup used a paint brush to "paint" the glue on the glass jar. Since we were making stripes, I gave Buttercup a stopping point where she shouldn't put glue. Once the area of the jar that we wanted to color was covered with glue, Buttercup used a plastic spoon to sprinkle sand over the glue covering most of it. I helped by shaking off the excess sand. Then we moved on to the next stripe repeating the process.


We finished on vase and were feeling pretty confident so we decided to make a pattern on the next one. Buttercup chose to make a sun. This time I made the sun shape with the glue and Buttercup sprinkled yellow sand on it. At the bottom of the vase we used green sand for "grass". On the remaining portion of the vase we used light blue sand for the "sky".


 Happy Homeschooling Adventures!!


Thursday, August 9, 2012

Muffin pan Meatloaf


I got this recipe from the Good Housekeeping Children's Cookbook and it was a huge hit with the family! I didn't have all of the ingredients so I adapted the recipe to account for those differences.

Here is my version:

Muffin Pan Meatloaf
Ingredients

  • 1 small onion
  • 2 cups of frozen corn kernels (thawed)
  • 1 large egg
  • 1 lb of ground beef
  • 1/2 lb of ground turkey
  • 1 cup bread crumbs
  • Salt, pepper, garlic powder to taste
  • 2 tsp rosemary

    Directions
    1. Preheat oven to 375 F.
    2. Spray the muffin pan with nonstick cooking spray (I didn't have that, so I just rubbed the cups with canola oil)
    3. Finely chop onion
    4. In a large  mixing bowl, mix the ground beef, ground turkey, finely chopped onion, egg ,  corn, and egg. Use your hands to mix it all until well combined.
    5. Add the seasoning and bread crumbs. Use your hands to work those in too.
    6. With your hands make large meatballs that will fit into the muffin pan cups and stick out a bit.
    7. Place the muffin pan in the oven for about  40 minutes. Use a meat thermometer to make sure the meatloaves are cooked through. The meat should reach between 165 and 170 F.
    8. The meatloaves should be nice and browned on the outside.
    9. Serve with roasted vegetables and rice.


    This recipe was easy to make, it's pretty healthy and it's different. The kids liked helping make it too, so that was fun.

    Do you have any special recipes that the kids enjoy helping with?

      Sunday, August 5, 2012

      Craft Project - Paper Plate Ladybugs

      [ladybugs.jpg]


      A while back I saw this arts and crafts project on the internet and since my daughter loves ladybugs we decided to give it a try. When I first saw the project, I had only seen this picture. I searched for the rightful owner so I could give her proper credit and here is her blog.

      Crafts by Amanda

      Buttercup and I each made one (a red ladybug and a purple ladybug). If you've read this blog before you'll know which of us made the red and the purple ladybugs (one of them is Buttercup's favorite color!!).

       What you'll need:
      • Paper plates (we used small ones)
      • Glue
      • Craft paint
      • Scissors
      I gave each of us 2 small paper plates. Using a pencil, we each made a large triangle where we would cut the plate.

      We also made a similar size triangle on the plate that didn't get cut. This triangle is where we used black paint. It doesn't need to be perfect because the other plate will be glued on top of the black painted one and will cover any imperfections.

      Then we painted the plate that had previously been cut. You can see our progress here.


      We set both plates aside and let them dry. Once the plates were completely dried we glued the colored, cut plate on top of the one painted in black. Make sure that the black triangle is exposed.

      Then we cut white circles to make the eyes (we used a paper plate), we also cut black circles to complete the eyes and for the ladybug's spots. We painted pieces of an extra paper plate in black for the face.


      We had so much fun making these ladybugs.


      Thanks Crafts by Amanda for the idea!!  Remember to always give credit when you find an awesome idea or tip. It's the fair and considerate thing to do.

      Happy Homeschooling Adventures!

      Wednesday, August 1, 2012

      Summer Olympics Theme Party!

      I have to admit I am not very athletic. I don't practice organized sports although I love to watch them. I especially love the Summer Olympics. Every four years, I live vicariously through all of those amazing atheletes.  I enjoy hearing the personal stories of how these seemingly common people got to the Olympics; their struggles and triumphs.

       My favorite part of the Olympics though is the Opening Ceremony. Of course, I am drawn to the amazing show, the lights, the music - I'm amazed at the amount of time and effort put in to create it all. I love learning about the host country. But most of all, I love the parade of athletes. There's something about seeing so many people from different countries, with different cultures, values and beliefs come together for a common goal. I feel the world is able to put aside their differences for a short time and that is what the Olympics and the althletes represent.

      So, in honor of the 2012 Summer Olympics, Buttercup and I decided to throw a little party the night of the opening ceremony. We were inspired by the many ideas we found on mommy blogs and crafty blogs! So thank you all for sharing your amazing talents.

      Here is a picture story of our personalized Olympic party!

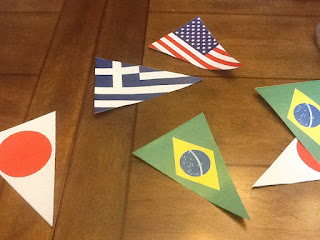
      We started by printing flags of countries. We included the US, England and Brazil (our family is from there), then just added the ones we liked.


      We used the printouts and toothpicks to make little flags to stick on our cupcakes.


      We made a variety of foods from different countries. Pizza (Italy), Hot dogs (US), Greek salad (Greece), cheeses (France), Passion fruit juice (Brazil), Bangers and Mash (England). We made little name cards with the flags to identify the food and its country of origin.


      We made red, white and blue dipped strawberries. We used white chocolate for one layer, then used blue food coloring to make the blue layer. They were pretty and super delicious!


      My very talented hubby turned the flags into pennants so we could decorate our house!


      Buttercup and I made paper plate olympic rings!


      Oh and who can forget the popcorn torches!


       I hope you are having as much fun watching the Summer Olympics as we are!! I'd love to hear how you are enjoying the Olympics. Also if you have any questions about any of these ideas, I'd be happy to answer them.


      LinkWithin