NavAO

Showing posts with label mom blogs. Show all posts

Tuesday, March 5, 2013

Visiting Museums with Kids. It can be done!

If you love museums and want to teach your kids to appreciate art at an early age, please read on.


I hear all the time (from friends, families, and readers)that taking young children to museums can be a daunting task. I've even heard a family member say that she will not step into a museum until her kids are teenagers. Well, by that point, it's too late, you might as well forget about it. Kids need to be exposed to various situations in order to learn appropriate behavior as well as an appreciation for things other than the Internet, Facebook, and Twitter.

Download my Museum Scavenger Hunt FREE!

Kids CAN go to museums and actually enjoy them. Kids SHOULD learn to appreciate art and to behave according to their surroundings when they are still young. I think parents' big mistake is to shield kids from these places and experiences out of fear. Instead, both parents and kids would benefit from this exposure. Parents will take pride in the fact that their kids are well behaved and well rounded individuals with multiple interests.


Explore
All of that said, I strongly believe that kids need guidance and structure when visiting places like museums.

Both of my daughters love art and visiting museums; I've been taking them since they were two years old.


Inspire
Here are some tips to make a museum visit an enjoyable experience for parents and kids alike:
  • Plan ahead
  • Get the kids involved (it makes them feels important)
  • Talk about the place you'll be visiting and what they'll be seeing
  • Do some research and choose a few of the art works on display to show the kids while still at home (this will get them excited for the visit)
  • Talk about artists (this can turn into a mini lesson!)
  • Take along a scavenger hunt (this gives kids purpose and they'll be excited when they find the items on their list) Print mine free here! or make up your own
  • Stop by the museum store BEFORE the visit and let your kids pick out a post card or two of art work. Then tell them they have to find those in the museum.
  • Know your kid's limit; if you see they are losing interest or getting antsy, it's time to leave
  • Bring a drawing pad and pencil and encourage your child to observe a favorite picture and draw it
  • Ask pointed questions about some paintings(this gets kids thinking)
  • Check with the museum if they offer their own scavenger hunt or other kid activities(many museums do). We recently visited the Metropolitan Museum of Art in NYC and they had a short guided tour just for kids with a hands on activity at the end. My daughter loved it.


Encourage


Envision
I have created a museum scavenger hunt that can be used in almost any museum! Print it here FREE.

Do you visit museums with your kids or are you afraid they'll be bored or misbehave? Share your opinions here!

Tuesday, November 20, 2012

Fall Arts and Crafts Project

If you live in the northeast, you know that this time of year we start spending lots of time indoors. Well, I do anyway. I am originally from Brazil. Need I say more? Seriously, even though I've lived in this beautiful country for a very, very long time, I just cannot get used to the cold weather. So I do "hole up" during the late fall and winter.

As a result, we do a lot of projects during this time. I've been searching for fun Fall projects, and we've been trying out different things.  Can I just say "Halleluiah for Pinterest"!!

Here are a couple of things we've done this Fall!!

Leaf Art

We started by dividing a white sheet of paper (we used computer paper) into six squares. We made the lines to separate the squares using a Sharpie. Next, using a pencil, Buttercup drew the leaves. I taught her to draw the veins first and then make the leaf around. It was hard at first, because she was used to drawing leaves the other way around (making the outline then filling in the leaf). But she got the hang of it and I can see an improvement in her drawing.


We outlined the leaves with Sharpie, then Buttercup painted each leaf in warm, Fall colors.

 
Finally, she painted the background of each square in a pattern of blue, green.


Falling Leaves on Wood


I thought this project was super cute and pretty easy to make.

Materials:
  • 8" x 14" piece of wood, 1/2" thick. This was what I had lying around. You could use a different size.
  • Wood stain.
  • Paper or plastic leaves.
Instructions:
  • Make sure the wood is sanded (we don't want to get splinters!)
  • We glued the fall colored leaves on the wood in a "falling pattern"
  • Once the glue dried, we covered everything with a coat of wood stain
  • We let it dry for 24 hours.
 
That's it. How can you not do this. Oh, and I got the inspiration from Pinterest.The project came from Craftiments, And, can I just say that hers is much nicer than mine. I actually didn't follow any instructions. I simply looked at the picture and came up with my own version of it.

Fall Door Hanging

 
This one came from searching the internet for ideas. A lot of what I found is really geared toward very young children. Well, Buttercup is seven so most of those projects would be boring for her. But this one was so perfect. The added benefits were practicing using scissors and tracing.

Materials:
  • Leaf foam cutouts (the writer used pre cut leaves and letters, but I didn't have that, so I used the templates from her site. I must say it worked out very well.) We used red, yellow, orange and purple (didn't have brown)
  • Letter foam cutouts (used the template from All Kids Network
  • Glue
  • Scissors
  • Ruler
  • String
Instructions:
  • I printed and cut out the leaf template and the letters.
  • I taped the leaf to a piece of foam and let Buttercup trace and cut 4 leaves.
  • I used the letter template to cut out foam letters.
  • Cut out a 4" x 8" foam rectangle.
  • Glue the letters HAPPY onto the rectangle.
  • Glue a letter on each foam leaf (FALL).
  • We hole punched the foam and tied string to each component to hold it all together.


What are some Fall projects you and your family are working on? I'd love to hear some ideas.

Happy Homeschooling Adventure!


Wednesday, November 7, 2012

The Happy Racers Review


We listen to music a lot in my house. In my car, I have "Free To Be" in the CD changer. We know all the words to all the songs. My oldest daughter grew up listen to "Peter and the Wolf". I think these types of CDs are great for kids. They are entertaining and educational; and they keep the kids away from the TV.

312294_220334984703344_1314763417_n

So, I was thrilled when I was contacted to review "The Happy Racers". The songs are great! It totally reminded me of "Free to Be" because it is so perfect for a sing along. This is the time I wish I had learned to play the guitar when I was a kid!! I totally envisioned myself playing acoustic guitar and singing these songs with my kids (outside by a campfire, of course!). Oh well, I'll have to settle for the CD!!

The first song on the CD,  "Move Your Body", gets your kids off the couch and dancing around. "I Can Do Anything" is fun and inspirational. Ad there's a great version of The Beatles song, "Ob-La-Di, Ob-La-Da".

The CD started as a family affair when Nathan Meckel wrote a song with his two children. I love that the Nathan even used his own kids' voices for some of the songs. It makes this CD so personal.

I have put this CD in my CD changer along with "Free to Be". We will be listening to this for a long time.

Check their website The Happy Racers!  You can also pick up the CD at Amazon!


Happy Homeschooling Adventures!


Wednesday, September 12, 2012

Book Review and GIVEAWAY!!! (Closed)

I am so excited to be reviewing the What to Expect books and offering you this GIVEAWAY. I'm excited because I just love this series of books and now I get to share them with you.

I read the first book in the series, What to Expect When You're Expecting, when I was pregnant with my first child. I got the book as a gift and I have to say it is one of the best gifts anyone can give to a pregnant woman.

As a first time mom, I was going through all kinds of emotions, talk about being hormonal! I was excited, scared, curious, happy, elated, and terrified; all in a matter  of minutes. Most of all, I didn't know what to expect(see what I did there?). And this is where the book comes in. It tells you that it's ok to feel all of those things. Not only is it ok, but it's completely normal.

I really loved checking the book to see what my baby looked like in the womb and following the growth patterns monthly. And anytime I had a question about pregnancy or what I was feeling, I consulted the book and usually got my answer.

This book empowers the pregnant woman by providing her with information. For example, when you're pregnant, whether it's with your first, second, or third child, you are most likely feeling overwhelmed. Knowing what you should ask your doctor during routinge appointments takes away some anxiety and lets you feel prepared. Having this go to resource that helps you in all aspects of your pregnancy is really priceless.

Then I had my precious baby and was given What to Expect: The First Year. I think this may be my favorite of the three books. It has a whole section dedicated to illnesses which was great because I didn't feel the need to call my doctor every day or even rush to the hospital needlessly. I had this amazing, informative book to allay my fears and keep me calm. Not only does the book list common illnesses, it teaches you simple home remedies to take care of a lot of the little health issues that may come up in a baby's first year.

It was great being able to know what babies usually do at different months and to see if my own baby was doing those things. I have heard critics say that this creates anxiety for parents, especially if their children are not growing or performing according to the book. But that was never my case, because I looked at it as a guideline. And if my child didn't quite do what the book said, I may have paid a little more attention. That's all.

Now, the What to Expect writers have done it again! They have released What to Expect: The Second Year and I couldn't be happier.
Some of the things you can expect in this new book will be familiar if you've read the other books. For example, there is plenty of information on your child's milestones, tips on daily care and how to spot problems.
Additionally, there is information about potty training, personal grooming (teeth brushing, bathing, hair washing, etc), and behavioral issues that start during this second year and how to handle them!! Love it.

Now here's the fun part.  I am excited to offer 2 Adventures of a Homeschohool Mom readers a collection of the What to Expect Book Series (that’s right 6 books in all, so 2 winners will receive 3 books each).
  • What to Expect When You're Expecting
  • What to Expect The First Year
  • What to Expect The Second Year

Just use the Rafflecopter entry form below. It's as simple as that! You can enter more than once, upping your chances of winning! This giveaway is open to US residents only.

THIS GIVEAWAY IS CLOSED.

http://www.rafflecopter.com/rafl/display/d9ff520/


Wednesday, September 5, 2012

Teaching Contractions in 1st, 2nd, or 3rd grade

Contractions are a funny thing, because once you know how to use them, you don't even think about it, it becomes second nature. But until then, it takes practice. Contractions are not easy for young children to master.

When Buttercup was in 1st grade, I introduced contractions and she initially had a hard time with it. I wanted to find a way to reinforce the idea without repetition or too many worksheets. There wasn't anything interesting on the Internet or in books, so I had to create an activity myself.

I came up with these flash cards that Buttercup and I use to play games. The flash cards come in pairs, so one of the pair has the two words written out (you are) and the other card has the corresponding contraction (you're).


  • The first game we played was simple. I showed Buttercup the words card, and asked her to read it. Then I showed the contraction card and I read it. We played his game until we got to the point where Buttercup would read both cards.
  • Another game we played was one where I would "flash" a words card and Buttercup would say the corresponding contraction. This was a favorite activity for her.
  • Then I would change it up and "flash" the contraction and she would tell me the words.
  • Contractions Match Game - I spread out the flash cards face down on the floor and we took turns flipping over two cards. If the words card matched the contractions card we keep the cards, if not turn them down again and another player would take a turn.
  • Sometimes Buttercup liked to play with the flash cards on her own and she would line them up side by side in two columns randomly (words cards in one column, contractions cards in another). The she would pick a card from one column and try to find its corresponding card in the other column. 
There are many ways to use these flash cards and they can be purchased in my shop for only $2.00. Once you print them, they can be laminated and will last a long time.

By making some of my original products available for a small charge, I can keep this site going and offer many more things for free as I already do.

Happy Homeschooling Adventures!
 

Monday, August 27, 2012

Our {Home} School Room

Ever since we started homeschooling, I've given lots of thought to our school room. We actually didn't have a dedicated space to home school. And since our decision to  home school happened very quickly, we were totally unprepared. What we had was an office/playroom. We moved some toys out of the playroom to make room for a bookshelf and a seating area. I really just wanted space for our books and other materials. We spent our first year of homeschooling doing "school" wherever we found space, ie dining room table, kitchen table, out on the patio, the local library, even the park.

That worked well for us, but it did take some planning because unless we were in our "school room" we had to plan ahead to get the right materials and books. All in all, not that big of a hassle.

As the school year wound down and summer rolled in, I started to think that I wanted a more dedicated space for school. I wanted a clutter free, organized space (I'm an organization freak). I live by the motto "Everything has a place and everything in its place". But the truth is, we just don't have that much space. I've seen pictures of other homeschoolers' "school" rooms and I must admit I feel jealous of the spacious, organized spaces they have. These rooms are so beautiful, full of shelves and books neatly organized on them. Bins and boxes for everything you can think of.

What I've realized is I have the space I need and I'm making the space work for us. It may not always be very organized but it does the job. The other thing I've realized is that I don't want to recreate a school environment in my home. I love being able to "do school" wherever we please. So as the new school year approaches, I have embraced the space we have and the flexibility to school anywhere.

Here are some pictures of our home school room.
 
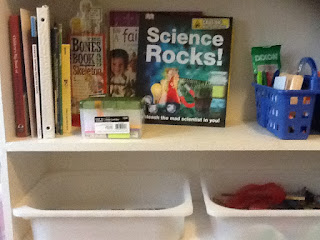
Close up of bins that I still have to label.

We have some of our books displayed and a caddy that holds pens, pencils, erasers, etc.

This is an index card box for our Book Club and Writer's Workshop. It has genres, writing prompts and techniques we will be studying and using.


Our Lego table is in our school room because Buttercup uses it a lot and we also do Lego challenges as part of school.

 
Where do you homeschool? Share here!!

Happy Homeschooling Adventures!!

Saturday, August 18, 2012

Slow Cooker recipe - Chicken and Lentil Stew


I have a rule about summer foods vs. winter foods. For me it's pretty clear cut. Crock pot recipes, like stews and soups are reserved for the winter when we are craving warm, comfort food. During the summer months I like to  make things that are light and fresh; lots of cold foods and plenty of grilling.


I recently broke my own rules by making this Chicken with Lentil Stew. The reason for the blatant anarchy was the need for having a healthy homemade meal without spending lots of time in the kitchen. I have been so busy this summer that by the time I get around to cooking it's either too late or I'm tired.

The crock pot takes care of that! So without further delay, here's my newest "go to" recipe!

Chicken with Lentil Stew

Ingredients:

6 boneless chicken breasts cubed
1 bag of lentils rinsed
3 plum tomatoes chopped
3 potatoes w/o skin and cut into chunks
3 cloves of garlic
1/2 onion
1 tbp tomato paste
2 chicken boullion
1 tsp rosemary
2 bay leaves
Salt and pepper to taste
1/2 cup red cooking wine
Water to cover everything

Directions:
  • Sautee chicken with garlic and onion until browned
  • Place chicken with garlic and onion in crock pot
  • Add all of the other ingredients to the crock pot (except potaotes)
  • Set the crock pot for 6 hours.
  • At about the 3rd hour add the potatoes
Optional ingredients:
  • Peas
  • Carrots
  • Celery
  • Bacon (pre-cooked)
These can all be added at the last hour.

Enjoy!

Sunday, August 5, 2012

Craft Project - Paper Plate Ladybugs

[ladybugs.jpg]


A while back I saw this arts and crafts project on the internet and since my daughter loves ladybugs we decided to give it a try. When I first saw the project, I had only seen this picture. I searched for the rightful owner so I could give her proper credit and here is her blog.

Crafts by Amanda

Buttercup and I each made one (a red ladybug and a purple ladybug). If you've read this blog before you'll know which of us made the red and the purple ladybugs (one of them is Buttercup's favorite color!!).

 What you'll need:
  • Paper plates (we used small ones)
  • Glue
  • Craft paint
  • Scissors
I gave each of us 2 small paper plates. Using a pencil, we each made a large triangle where we would cut the plate.

We also made a similar size triangle on the plate that didn't get cut. This triangle is where we used black paint. It doesn't need to be perfect because the other plate will be glued on top of the black painted one and will cover any imperfections.

Then we painted the plate that had previously been cut. You can see our progress here.


We set both plates aside and let them dry. Once the plates were completely dried we glued the colored, cut plate on top of the one painted in black. Make sure that the black triangle is exposed.

Then we cut white circles to make the eyes (we used a paper plate), we also cut black circles to complete the eyes and for the ladybug's spots. We painted pieces of an extra paper plate in black for the face.


We had so much fun making these ladybugs.


Thanks Crafts by Amanda for the idea!!  Remember to always give credit when you find an awesome idea or tip. It's the fair and considerate thing to do.

Happy Homeschooling Adventures!

Sunday, July 22, 2012

Welcome to Mom's Monday Mingle.
Last week we had over 200 moms ready to mingle! Can't wait to see what round 13 brings! If you could help promote, Mom's Monday Mingle through facebook and twitter that would really help. Thanks for helping promote. It really does help make this hop a success and bring new moms to meet and network with.
Thank you!

Return next week to see if you are the next, "Mystery Host!


Monday, July 16, 2012

Healthy eating for the whole family - A Step by Step Guide

I've been on a kick recently to cut out as much of the processed foods out of our diet as possible. Well, actually, it's not a kick since I've been doing it for years now. I guess you could call it a mission.

Yes, I'm on a mission to keep my family healthy and to teach my daughters good eating habits. To that end, 90% of what we consume is purchased fresh. I don't buy anything packaged except for crackers, pasta, rice and a few other items. I do not have one aluminum can in my pantry.

Ever since I read about all of the chemicals that seep from the can into our food, I cannot bring myself to eat anything out of a can.  Taking a stand agains aluminum cans was easy since we already had the habit of avoiding canned goods (we just don't like how the food tastes out of a can). But there was one item that we used quite a bit...tomato sauce. Finding plain tomato sauce in a different container was hard to do. So my dear husband had the hare brained idea to make our own tomato sauce. I actually tried to do it, but found it to be too time consuming, not to mention, the mess I made.  I finally found tomato sauce in small cartons. No chemicals and the price was really reasonable compared to the cans.

The more I read about what's in our food, the more I am determined to cut out the processed foods. It's really scary. It's not just about eating chemical, pesticide, and additive free. It's about making sure my family is eating the best, freshest, safest food possible. By making all of our food fresh I can control what goes into it (fat, butter, oil) and how it is prepared (baked vs. fried).
Here are the top ways I have found to promote healthy eating at home and when we go out.

  • Planning - I plan weekly menus so we are not tempted to "eat just anything unhealthy" just because everyone's hungry. Menu planning also makes it easier to go food shopping because you are more likely to stay within budget when you stick to a list. By planning ahead, you can make sure you have all of the ingredients you will need for the meals you want to make.

  • Shopping - I choose to shop in stores that have more organic and natural food choices. Although I don't buy strictly organic, I do look for certain things like seafood that is wild caught instead of farm raised. You would be shocked at the conditions of most of these "fish farms" and how much bacteria and other stuff is in your seafood. Another thing to remember is that the FDA regulations when it comes to imported seafood are very lax. I've read that only about 5% of imported seafood is actually regulated. Scary!

  • Getting the kids involved - Asking for the kids' input in meal planning teaches them to make good choices and it helps them see the value of eating healthy vs. eating junk food.

  • Setting Limits - We don't have any type of junk food in our house. The children do not eat chips or drink soda. But as parents we do understand that kids like that kind of stuff. So we allow our kids to eat junk food on weekends. But it is not a free for all, there are still limits and they have to show moderation.

  • Finding balance - I think it's important to teach kids to seek balance in all aspects of their lives. It is no different with food. Since we don't eat cookies or other packaged sweets, when the kids crave a "sugary treat", we will bake fresh cookies. The kids get to eat cookies, they help in the kitchen with the baking and I know what they're eating(no chemicals or additives).
  • From frozen to fresh vegetables - Did you know that the US government allows a certain amount of bugs, maggots, larvae and other insects in our frozen vegetables? Yes, it's completely acceptable, so it should come as no surprise that with every bite of your frozen broccoli or corn, there are crushed up insects that you are unknowingly consuming. How gross is that? I knew that canned veggies were bad, but I always thought I was safe with the frozen ones. On the upside, it is very easy to prepare fresh veggies. Of course, you can purchase and eat them right away. But vegetables perish quickly so you need other options. See "Storing" below for tips.

Heres the article that changed everything for me    8 Bugs You Don't Know You're Eating


  • From processed to homemade - My oldest daughter practices sports and is very active. She's also always hungry and really relies on those power bars or fruit bars for energy throughout her day. So I decided that I would start making my own energy bars! My daughter was willing to try them out which was a great first step. It turned out that she loved them and asks for those little energy bars all the time! Not only am I saving money, but my daughter is eating something fresh, homemade and with no additives. It's a win-win in my book.

  • Storing - After I wash all of my leafy greens (lettuce, spinach, collard greens) I dry them with a clean towel and store them separately in sealable containers always with a paper towel. The paper towel absorbs any moisture and the leafy greens stay fresh longer. With other veggies, I'll wash them well, then blanch them quickly in boiling water. Once they're cool enough, I store them in the freezer. When I need them, all I have to do is put the veggies in a bowl with a little bit of water and microwave it for 30 seconds to a minute. They are ready to be consumed!

  • Cooking ahead and freezing - This is a good tip for us busy moms juggling a million things at once. Take a couple of hours on a Sunday and prepare your meals for the week, then freeze them. When you are busy and need a quick dinner, pull one of those dishes out of the freezer and you are still providing your family with a healthy homemade option.

  • From Canned to fresh - Buy dried beans instead of canned. It's a little more work but it's totally worth it. I wash and soak the beans, then cook them without any seasoning. I freeze them until I'm ready to use. I do this with black beans, red beans even lentils.

  • Your local farm - Go to your local farm for fresh eggs, meat, and poultry. This way you can be sure you are buying eggs and poultry from free range chickens and the meat comes from cows that are grain fed without hormones.

Other steps I hope to take:
  • Growing my own food
  • Raising chickens for eggs
  • Making my own bread and pasta
For now, I can feel good about the fact that my kids are learning healthy eating habits and becoming educated about food choices and nutrition. And I can rest assured that I won't find any bugs, animal or human parts in our food. Yuck. How many of those stories have you read? Too many for me!

What about you? Are you a junk food junkie or a healthy eater, or somewhere in between? I would love to hear your thoughts!

Friday, June 8, 2012

Summer Activity Ideas

Summer is around the corner and we are looking forward to 2 months with our kids at home. But, the truth is, after a couple of weeks the kids start getting bored! I am constantly hearing things like "What are we going to do today?" or "What can I do now?"


So, a few years ago I came up with a Summer Fun jar. I asked my kids what kinds of things they'd like to do over the summer. The rules were simple: 1)the ideas had to be financially feasible, so no "We want to spend the summer traveling around Europe", 2)they had to be things every family member could enjoy together.

I wrote each idea on a strip of paper, folded the paper and put them all in a jar. Each week the kids got to randomly pick one piece of paper from the jar. Whatever was on the paper we had to do within the course of that week.

The Summer Fun jar worked so well. The kids looked forward to picking a "surprise" from the jar each week. And of course, they made sure we followed through and did whatever was written on the paper strip. Now that Buttercup is older and can write, I give her the strips and she writes the ideas on her own.


Each year, we add or change items to the list. It's up to the kids!!

Here's this year's list.
  • Go to the zoo
  • Go to the beach
  • Make a backyard obstacle course (I make sure there's some water feature to keep everyone cool)
  • Go to NY (my kids love the city and there's always something fun going on)
  • Pack a lunch and go on a picnic
  • Go to the park
  • Make outdoor art (I tape a very large paper to the side of the house and let the kids get creative, it's very Jackson Pollock!)
  • Go on a hike
  • Go out for ice cream
  • Catch fireflies (then release them)
  • Go to a movie in the park (lots of towns offer them, just bring a blanket or chair)
  • Go for a bike ride
  • Make s'mores and watch the stars


What are some of the things you'd like to do with your children this summer?

Happy Homeschooling Adventures!!

Wednesday, June 6, 2012

What kind of home school approach do you follow?


That seems to be a very popular question! When I started homeschooling Buttercup, I was kind of thrown into it suddenly. I didn't have much time to research the different approaches to homeschooling. To be honest, I didn't know there were so many approaches to homeschooling. In my ignorant bliss, I just assumed people put together their own materials and study programs. Now, a whole school year later, I know that's not the case.

But that is how I did it, as a teacher myself, I already had knowledge and experience enough to come up with a program. But whenever I am asked what is our home school approach, I don't have an answer.

Well, I recently read an article on www.homeschool-curriculum.org that finally clarified all of the different approaches for me. The explanations are clear and concise; it also includes why some parents choose each approach.

Finally, I have an answer to stranger's questions....but why do I care what they think? Actually, I don't. It was more for me. And the answer is I don't really follow any approach. I do what feels right for me and my child. She gets to have a say in most of what she learns. I determine what are "the must haves". Buttercup gets plenty of free time to explore the great outdoors, museums, parks and other activities. We try to do as much hands on stuff as we can. I don't have textbooks, but I like the idea of keeping in line with our state guidelines.

Anyway, if you are starting on your own homeschooling journey, this website will be very helpful. I recommend reading the different approaches and trying them to see what works for your family.

Here's the link:

www.homeschool-curriculum.org


Also here are some other posts that might interest you.

5 Reasons I Home School

How I made the decision to home school p1

How I made the decision to home school p2


Tuesday, June 5, 2012

I joined BlogFrog!!

Hi everyone,

Just wanted to share that I am now on BlogFrog. I have a community called Homeschool Adventures! It is a really fun community where homeschoolers can share their ideas, ask questions and connect with other homeschoolers. It is also a great place to showcase your own blog.

Join me at the Homeschool Adventures community at BlogFrog!! Click here!

The Dangers of Homeschooling

I just came across this on Twitter and it is a YouTube video by a homeschooled kid on "The Dangers of Homeschooling". It is so creative and absolutely funny, I just had to share.

Just click on the link and enjoy!

The Dangers of Homeschooling

Monday, June 4, 2012

Homeschool Resources - The Homeschool Handbook

As a homeschool mom, I am constantly searching for resources, ideas and general information that can make the homeschool experience more fulfilling and enriching for both my daughter and myself.

With that in mind, I'd like to share a resource I recently came across that I think other homeschoolers will find helpful.

The Homeschool Handbook covers everything from curriculum to field trips, crafts, health and fitness, and much more!

I would recommend The Homeschool Handbook to anyone starting to homeschool or a seasoned homeschooler.


Happy Adventures!

Saturday, June 2, 2012

Homeschool Resources on the Web - Lots of Free Stuff!

I've been meaning to write this post for quite a while. It's finally here. When I started homeschooling my first grader, I did a ton of research to find online resources to help me along. Needless to say, there is so much out there it can get overwhelming. I discovered and used these websites and its resources throughout the year. I started with a much longer list, but it is now down to this one that I am sharing with  you.

These websites are free for the most part, they offer instruction, worksheets or general help.They are not specifically geared toward homeschoolers, but I don't think that matters. The content is good whether your child is homeschooled or attends public school.

I hope to grow this list as I find other good educational websites. And if you love a website that is not on this list, please let me know in the comments below. I will check it out and possibly add it to my list.

General Education Sites (these sites include a variety of subjects within each site, they are not specific to one subject)


Math Websites (these websites are specific to math only)

www.ixl.com (a note about this math site: they allow you to try it for free, if you like it, and I guarantee you will, there is a membership fee that gives you unlimited access)


I hope this list helps you in your own search for homeschool materials! Hopefully I've done some of the leg work for you.

Do you have a favorite website? Please let me know.

Thursday, May 31, 2012

Top 5 reasons I chose to homeschool

Like I've said before, the decison to homeschool your children is a very personal one. Everyone needs to do their own research, look into their state's laws, and most importantly consider what's best for their children.
Here are my personal reasons for homeschooling my own child:

1) She gets a better education at home - I've witnessed first hand how schools are lowering their standards to cater to low achieving students; public schools are way too concerned with standardized test scores; public schools stifle kids imagination; kids are taught to blindly accept what they are being taught, instead of questioning and exploring the subjects

2) We work at her pace, which usually is faster than a public school - I noticed that a lot of time spent at school is wasted. Kids usually spend about 6 hours at school, at home, we can get the work done in half the time.

3) Learning is personalized - Homeschooled kids can explore their interests much more freely. They can delve deeper into subjects they are interested in, instead of just superficially as in school.

4) Flexibility - I love being able to make our own schedule according to the day. Sometimes we want to sleep in and we will start school late, then we'll just work a little longer too. If it's a nice day we will do a lesson in the park or library.

5) I get to spend more time with my child - This was a big one for me. We have only so much time before our kids grow up and go live their own lives. I want to spend as much time with my kids right now as I can.

I'm sure there are almost as many reasons for homeschooling as there are people actually doing it. These are just my reasons. It was with these five points in mind, that I decided homeschooling was the best choice for us right now.

I hope I can help other moms out there who are considering the homeschooling option. I'll be happy to answer any questions as best as I can. I'd love to hear from other moms.

What are your reasons for homeschooling?

Thursday, May 24, 2012

1st Grade Art Project Idea - Tissue Paper Butterfly

Here's a very simple art project idea. I remember when my oldest daughter was in school and she used to make all sorts of art projects with tissue paper. So I've been thinking of doing something similar with my 6 year old. I finally went out and bought a pack of tissue paper in assorted colors. I got mine at a dollar store! The only materials you need are glue, tissue paper, a white sheet of paper, a pencil and a sharpie.

We started by drawing our butterfly. Then we traced the drawing with a Sharpie to make the borders very visible. After that we just started ripping small pieces of tissue paper, crumbling them and gluing to our picture. We did them in a pattern, but it can be done randomly as well.

If you are ever looking for a last minute or quick and easy art project, this is it!! Since it is Spring right now, this colorful butterfly fits right in with the season. I think this project would make a great rainy day activity also. Other tissue paper art ideas are flowers in a vase, a garden scene with birds, trees and flowers, a rainbow or a flag.

My daughter had so much fun "creating" her butterfly. Here are some pictures!


LinkWithin